Happy April to everyone! Pink Lady Esther here with and bringing you another
tutorial. This tutorial is based on some request/questions/feedback
that I saw in the Sweet Shoppe Designs Forum in the thread "Scrapbook
Questions?? Ask the Pink Ladies." I saw that some were interested in
knowing how to create custom shape text boxes in Photoshop Elements. I
do admit that most of my tutorials tend to be in Photoshop CC 2022 as
that is the platform that I use for my scrapping. This month (and next
month), I'm shifting gears a bit and my tutorial will be based on using
Photoshop Elements.
This tutorial will be a 2 part tutorial.
This month, I'm focusing on simple shapes and next month it will be
complex shapes. This tutorial is based on Photoshop Elements 2021, so
the steps could vary slightly based on your version of PSE.
Also
keep in mind, that for this tutorial, I'm super sizing the element that I
will be using to create the custom shape text box. I'm doing this to
better show the detail.
I'm starting with a blank 12x12 canvas
and I applied a white background fill just to make it easier to see the
details. You do not have to apply the fill layer when you creating this
for your own project.
1. I’m using this shape from Pink Reptile
Designs “ Then & Now” bundle. It’s the strips_foam element. I chose
this one because it’s simple enough without it being a standard shape
and this particular element will allow the technique to be repeated 4x
so that text can be on each strip. This type of element would be a
perfect element to use for the repetition of the technique. (Keep in
mind, I enlarged this element to fill my page a bit).
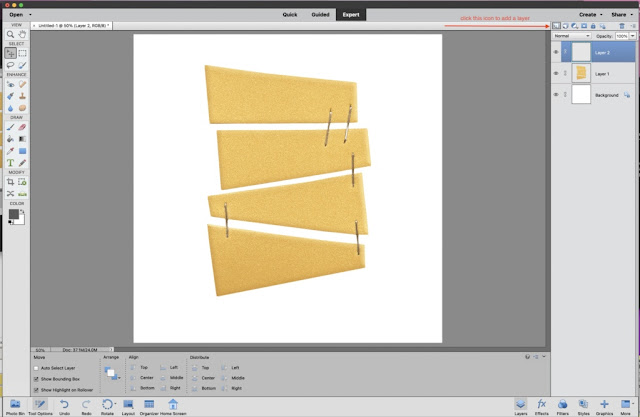
2. Look to the right, you can see that I have my background layer and then my element is layer 1. The next thing I’m going to do is add a layer. I will need these layer to create my custom shape. To add a layer, I want to make sure I have “layer 1” selected. With this being selected, when I add the layer, it will add it right above “layer 1.” See the photo below to see the way to add a layer quickly.
3. With the layer 2 selected, then go to your “draw” menu bar and click on the shape tool. After you click on the shape tool, notice that down below, more options pop up. This is important, I will be spending some time in these additional options section. (At this time, I selected a darker color for my custom shape, as I wanted to make sure it was easy to identify in the layers as being different then my reference element/shape).
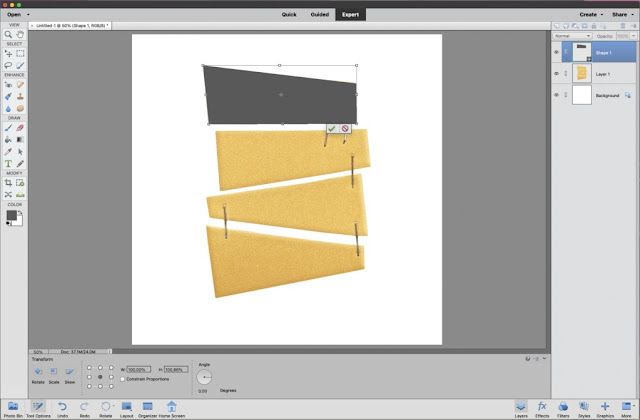
4. The next step is to select a shape from the additional options section that closely matches the custom shape you want to make. For the element, that I have selected, I’m actually going to use a rectangle and modify it. Taking the rectangle shape tool, I’m going to create a rectangle that covers the entire space of my foam strip. I do this by clicking on the rectangle and clicking in the top left corner of my strip and dragging down to the right until I achieve the desired rectangle shape. Once I release the click of my mouse, my shape is then formed. So don’t release the mouse until the desired shape is achieved.
5. After I release the mouse, my rectangle is now in place. The next thing to do is to modify this rectangle so that it resembles the shape of the foam strip underneath it. With the shape selected, I should see the control box around it, press Control (windows) or Command (Mac) and take the top right corner and drag it down to meet the top right corner of the foam strip. (If you get a message that says it will turn this shape into a regular path, just hit “Yes.”).
6. Following the same process from step 5, I did the same thing to the lower left corner. Brought it in and up to match the shape of the foam strip.
7. For the next 3 strips, the decision has to be made, do I want each strip to have it’s own custom text box, or do I want it to be a continuous extension of the first text box. For the sake of this tutorial, each strip will be it’s own separate text box. I then went back and repeated steps 2-6. Keep in mind that when I’m finished with creating these custom text boxes, I should have a total of 4 shape layers showing on the right.
***You will also notice that I made my custom text boxes pulled away slightly from the left edge and the bottom, I did this to ensure my text didn’t sit all the way to the left nor to close to the bottom.***
8. With all my separate shape layers complete, the next step is to add the text the layers. Before making my text layer, I made sure I had the text I wanted to use ready to copy and paste. I could also type freely in the text box if I wanted to, but for the sake of the tutorial, I’m copying and pasting into the text box. Starting with shape layer 1, I selected that layer. I then went over and clicked on the “text” box option from the left. That then allowed more options at the bottom, I selected the horizontal text direction, chose my font, font size, color and how I wanted my text aligned (for this tutorial, I chose left text align for the first text box).
9. I then copied the text I wanted to used and took my cursor and hovered over shape 1. The cursor should turn to a circle shape when hovering over the inside of the shape. (It’s a rectangle when outside of the shape). With the cursor as a circle, I clicked inside the shape box and pasted my text.
10. Now that I have the text pasted in, I hid shape 1 so it isn’t visible.
11. I repeated steps 8 & 9 for shapes 2-4. The only thing different that I did for each layer was change the alignment of my text. For shape 2, I chose center align. For shape 3, I chose right aligned and for shape 4, I chose left align. This is what the remaining text layers look like on top of the shape layers.
12. When I hid the shape layers, this is what the text looks like in the custom text boxes. In reality, I would do some more tweaking to make sure my text didn’t run over the staples, but hopefully this provides a good visualization of the options one can have with custom text boxes.
Hope you enjoyed this tutorial and can’t wait to see what you do with it. I’ll see you again next month and I will walk you through more complex shape text boxes.
If you have any questions, feel free to drop them below!.
xxxxx,
Esther


very nice tutorial in PSE for this! thanks!
ReplyDeletewe are so happy you find it helpful Melinda :)
DeleteWow! That is so cool
ReplyDelete