Last month, we had an overview of Adobe Lightroom and the differences
between Lightroom Classic and Lightroom CC. Now, we’re going to talk
about how I use Lightroom Classic when digital scrapbooking, more
specifically the Library Module.
It seems like I’m using my cell
phone for most of my photos these days, so that’s where I’m going to go
to download a group of photos.
Remember, the left hand side of the screen is representative of your
computer hard drive. So to select my source I’ll scroll down to iCloud
photos and downloads. Notice I have several other spots that I
could select for my photo source, like Dropbox, Google Drive, OneDrive and iCloud Drive. The process is the same.
All of the photos in that folder will populate in the center of the
screen. Potential duplicates are grayed out because I have “Don’t import
suspected duplicates” checked on the right hand side. I’ll check only
the photos I want to import. I should mention I’m not a deleter, not
in-camera or on my hard drive for the most part.
I have my Lightroom set up to Build Smart Previews on import. Smart
previews are a different smaller type of file, a DNG file, that allow
you to edit images that aren’t connected to your computer, like an EHD
that is disconnected. I also have it set to not import duplicates like I
mentioned.
To maintain consistency, I do rename files according
to date. My destination is a Photos folder on my Synology where a new
date subfolder is automatically created by photo date. I upload using a
copyright with my name and the year so I know which photos I actually
took myself. I could choose to apply a specific preset to the entire
batch upon import, too.
You’ll note at the top that I have it set
to COPY my photos upon import instead of MOVE. Let’s just say that I
had a bad experience where I thought I imported images but somehow
deleted them and lost the opportunity to import them again. So now, I
Copy them instead and then once in a while I’ll go into that downloads
folder and delete all the images. This is totally personal preference.
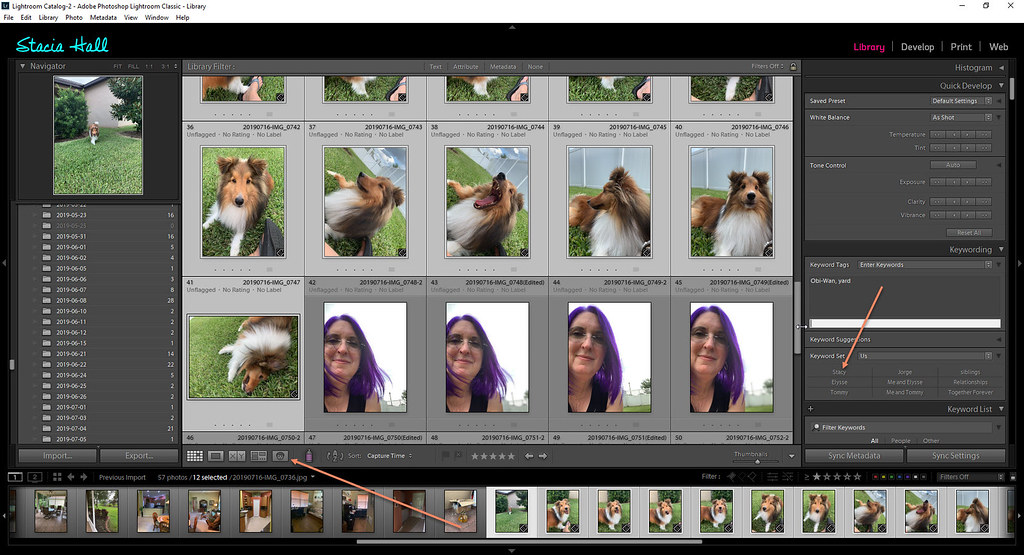
After import, my first step is generally to scroll down and add Keyword
tags on the right hand side. Add as many keywords/phrases as you want
and hit enter. They’ll all show up in the box separated by commas. This
is where it’s important to be detailed. The more keywords you have, the
easier it will be to search your photos later.
Notice the Keyword Set area on the right side. I have one called US
that includes each of my immediate family members and then a couple of
groups that I use all the time. Family and relationships tend to be the
focus of many of my pages so that keyword set is the one used most
often. You can create several nine keyword groups as set favorites and
use them as quick one-clicks.
In the middle section above the filmstrip there is a little rectangle
with a face on it. This is for facial recognition and it’s pretty
awesome! You click on it and all of the faces in the photos are brought
into the middle. For faces it recognizes, Lightroom will add a suggested
name.
I don’t use facial recognition all the time. In an upload
including a lot of crowd or travel photos like from my daughter’s
honeymoon I didn’t use facial recognition because it would have tried to
tag all the random people on the streets. It was easier just to tag the
two of them using the keyword set.
You can approve the suggested name by clicking the checkmark. You can
change the name or click no if it’s not a face you want to tag. The more
photos you add and tag with names, the smarter the program gets about
recognizing the faces.
My next step is to rate my photos with a certain number of stars. No
stars - a “meh” photo I’m not itching to use for anything. 1 star – this
I would use to scrapbook or print. 2 stars – a great photo that I know
I’ll use. 3 stars – daughter in her wedding dress AMAZING kind of stuff
:)
Remember when I said that I don’t delete many photos? I do
that because I never know what I might use to tell a story. Sometimes
you have good pictures to support a memory, sometimes you don’t. And I
have been known to use a blurry photo if it captured the feeling of the
moment.
I generally find it better to rate my photos using the full screen mode
or FIT view (the second rectangle above the filmstrip) so that I can see
the sharpness of the photo. You can scroll right or left in the
filmstrip along the bottom or use the arrow keys.
A useful tool when rating photos is the Comparison View, the rectangle
with the XY. I find this most helpful when looking at multiple photos
from a photoshoot or event to narrow down my favorites.
If you want to look at more than two similar photos, you can use the Survey View.
Another method of selecting good or bad photos to be deleted is to
utilize the pick and reject flags. The white flag is used for picks, the
black flag for rejects. Some people use the “pick” to mark the photos
they want to use or print, like I use the 1 star designation.
Others use the “reject” flag to mark the photos they want to delete
after evaluating them. To do this, you would filter by the black flag at
the top of the screen to get all the photos (from your most recent
import if that’s the folder you have selected on the left hand side)
you’ve marked for deletion. Then hit the delete key.
Of course, the program wants to know
if you’re sure! To confirm
deletion, select either delete from disk or remove. Delete from disk
means delete from your computer completely, remove just takes them out
of the Lightroom catalog.
Now that we’ve imported our photos, added
keywords and ratings if we choose and deleted any photos we don’t want
to keep, we can scrapbook one of these photos, print it, include it in a
photobook or use it on social media. Next month, we’ll focus on
using
the keywords and ratings to search for other photos in your library and
then we’ll edit them for use on your digital scrapbook pages.
See you next time!
_________________
Stacia


No comments:
Post a Comment
Note: only a member of this blog may post a comment.