In this tutorial I will show you one way of how you can make a pencil drawing effect using adobe photoshop. I will show you step by step how I create this cool effect making use of filters and blend modes.
This is the layout I made with my pencil drawing photo.

And this is how I got there:
And this is how I got there:
1. Choose a photo that you would like to look like it was drawn with a pencil.
Here's mine: a picture of my DH playing his bass guitar.
Here's mine: a picture of my DH playing his bass guitar.

2. Next thing we need to do is turn it into a black and white image by choosing image > adjustments > desaturate (yes that is another photo in the image, a girl can change her mind, right? no need to do EVERYTHING over again...LOL)

3. Duplicate that layer by choosing layer > duplicate layer or by using the shortcut ctrl J on PC or command J on the Mac.
4. Select the top (duplicated) layer and invert it by choosing image > adjustments > invert or by using the shortcut ctrl I on PC or command I on the Mac. Your top photo layer should look something like this now. Kinda spooky huh?

5. Now set this layer's blend mode to color dodge

My photo looks like this now! Yup all white. Maybe yours shows a few black pixels here and there and that's okay too as long as it is not a lot! If you do have a lot of black you might have selected color burn instead of color dodge!

6. It's all going to change when we make the next step, which is choose filter > blur > gaussian blur

you will all of a sudden get something like this

Now start playing with the slider until you get the desired effect (this will be different per photo but make sure you don't exaggerate it either way, too much or too less). You will probably end up somewhere between 5 and 7.5 pixels)

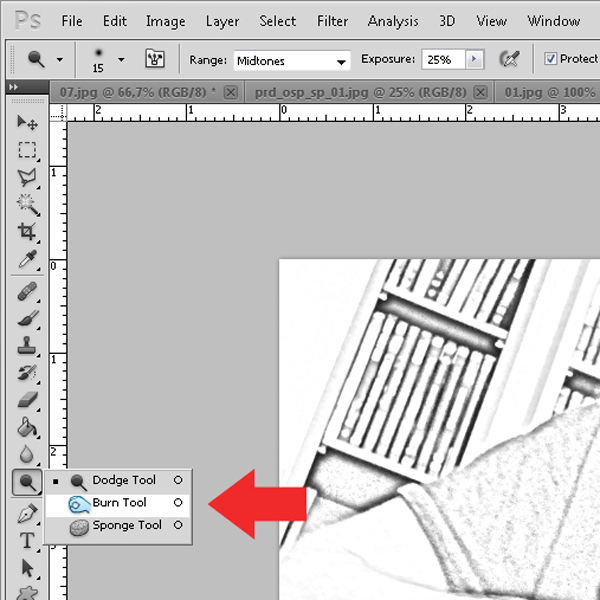
7. We already have a great result by now but maybe you want to do some more fine tuning in the contrast. I would like his hair, beard and eyes to have a bit more contrast and I don't like the grey blots on his arms. So I am using the color dodge and burn tool to fix that (color dodge to lighten up areas and burn to darken). Make sure you set the exposure to about 10% so whatever you do is subtle. Mine is still set at 25% in this image (see? on the menu bar at the top)
8. When you are satisfied then merge the two layers that you have by selecting them both and using shortcut ctrl E on PC and you guessed it, command E on the Mac. You could also go via the layers menu and choose merge layers. Whatever you prefer. Now it's time to add a background paper and blend the 2.
I chose this paper I made for the Life is Good add-on, part of a collab I did with Val C designs because it has a nice subtle texture and because I love the ever so slightly grunged up borders.

9. Paste the paper under the pencil sketch photo then select your photo and choose blend mode multiply (you should play with other blend modes too and see what gorgeous other effects you can create!!)

That should get you something like this:

10. That brings us to the final step, just one last tweak!
Duplicate the photo layer (see step 3) and with the duplicate layer selected choose filter > other > high pass (note that this layer will also have the multiply blend mode and that okay, just leave it like that)

Adjust the slider so you will get a nice sharp effect, I set mine at 1.3

As you can see this layer is all grey and that exactly how it should be. Now change the layer's blend mode from multiply to hard light and adjust the opacity to your likings. I set it at 50 % to get this nice sharp effect and slightly more contrast but not too much. (yep it's that other photo again, but you get the point)

and this is my end picture

I hope you enjoyed the tutorial and that will be able to use this technique in your pages!
Great tutorial, thank you! I've done it before, but I can never remember all the steps!
ReplyDeleteThank-you so much; I'm really excited to try this! :)
ReplyDeleteWow, this is really awesome and you make it sound soooo simple! I'm going to try it right now! I showed my DH the before, middle and after and he already suggested a photo to try it on LOL. Thanks Mirjam, I really appreciate the tutorial!
ReplyDeleteMany Blessings! Deborah/JoyfullyOrange
Did your DH like the end result of his photo? Tell him I love his 6string bass ;o) (My ex plays bass)
this is awesome! i can't wait to try it out!
ReplyDeleteI tried several time to obtain a sketchy effect to no avail. Your is the first tutorial that really worked for me, and I LOVE the effect!
ReplyDeleteSo thank you, thank you, thank you!
Ari
thank you this was great
ReplyDeleteThank you so so so much for this tutorial (pencil look) and all the screen grabs too - extra K.I.S.S for learners like me. You are such a sweetheart! Love reading your blog, and you are just the best writer, very funny!
ReplyDeleteTo make sure it is, simply install SoftOrbits Photo to Sketch Converter on your PC or laptop and try it! You will find numerous templates that you can use to create dramatically different sketch effects.
ReplyDeleteonline text generator
Blur background Photo Editor & Blur image Background Effect on image effective blur background app to give your picture DSLR blur effect. Select a photo from your mobile gallery.
ReplyDelete