
And just like that we are springing into May! Pink Lady Esther here
with and bringing you another tutorial. This tutorial is a
continuation from last month's tutorial. Part 2, coming right up!
In
this tutorial, I'm focusing on custom shape text box with complex
shapes. For this tutorial, I will be using Photoshop Elements 2021, so
the steps could vary slightly based on your version of PSE.
Also
keep in mind, that for this tutorial, I'm super sizing the element that I
will be using to create the custom shape text box. I'm doing this to
better show the detail.
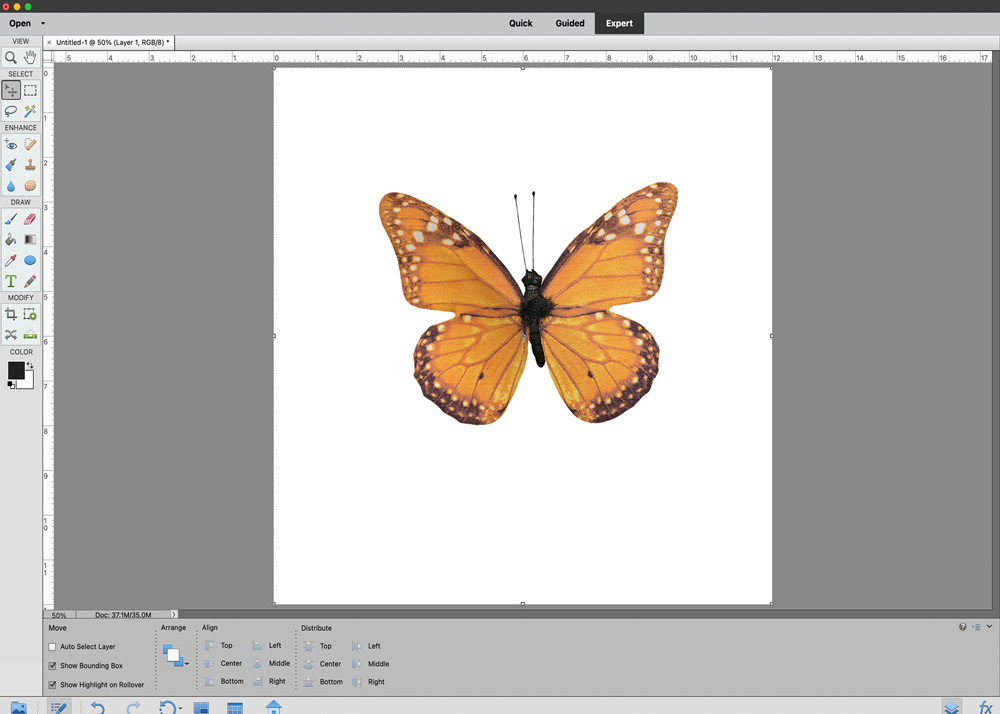
I'm starting with a blank 12x12 canvas
and I applied a white background fill just to make it easier to see the
details. You do not have to apply the fill layer when you creating this
for your own project.
1. I’m using this butterfly from Pink
Reptile Designs “ Room with a View” kit. I chose this element because
it’s complex enough to learn the technique, but not so complex to be
confusing.. (Keep in mind, I enlarged this element to fill my page a
bit).
2. Before we start building the custom shape for the text box, let’s mentally/visually divide this butterfly into five sections. We will work it each section to help build this custom shape. I’ve added guidelines below to show how I’m dividing this butterfly into sections.

3. To create this custom shape, I will be making a series of custom shapes that I will then merge together at the end. With the butterfly layer selected, then go to your “draw” menu bar and click on the shape tool. After you click on the shape tool, notice that down below, more options pop up. This is important, I will be spending some time in these additional options section. (At this time, I selected a darker color for my custom shape, as I wanted to make sure it was easy to identify in the layers as being different then my reference element/shape. I will also be using different colors in my shapes to make it easier to show how I’m layer and building. You don’t have to change your colors if you don’t want to.)

4. The next step is to select a shape from the additional options section that closely matches the custom shape you want to make. For the element, that I have selected, I’m actually going to use the oval/ellipse shape. Taking the ellipse shape tool, I’m going to create an oval that covers the the majority of the top left wing of the butterfly. I do this by clicking in the top left wing of the butterfly and dragging down to the right until I achieve the desired coverage. Once I release the click of my mouse, my shape is then formed. So don’t release the mouse until the desired shape is achieved. ***note: it will take a series of shapes to adequately create the right coverage, I will build on this as I go.***

5. After I release the mouse, my oval is now in place. The next thing to do is to modify this oval so that it covers a good portion of the left upper wing. With the shape selected, I should see the control box around it, press Control (windows) or Command (Mac) and and using the control box symbols, stretch and modify that oval to where it takes on a similar look as below. (The key to this working well is the use of the control/command key.) (If you get a message that says it will turn this shape into a regular path, just hit “Yes.”).

6. Now take that modified oval that we just stretched out and copy it. (right click and hit copy or press Control (Windows) or Command (Mac) with the letter "j" and that will create a copy). Take this copy and place it in a similar fashion on the right upper wing of the butterfly.

7. Going back to the upper left wing, go back to the custom shape area, using the ellipse/oval tool add another oval to the left upper wing.

8. Now the oval has to be modified to cover more of the upper left wing. (Follow step 5 to modify this shape).

9.Follow step 6 to place it on the right upper wing

10. Now we are going to add a ROUNDED rectangle to help fill in that lower portion of the left upper wing. You can find the rounded rectangle in the custom shape area. Look at the yellow rectangle I've added below.

11. Then I modify the rectangle to cover more of the lower corner of the top left wing. (Follow step 5 to modify this shape).

12. Repeat steps 9-10 to add the ROUNDED rectangle to the lower portion of the right upper wing.

13. For the lower wings, I applied the same concept from steps 5-8


14. For the inside portion of the lower left and right wing, instead of using a rounded rectangle, I continued the same process and used the oval/ellipse shape and modified it.

15. For the body of the butterfly, I used the oval/ellipse shape and modified it to cover the body of the butterfly and overlap the shapes. This overlap here in the center is very important.

16. Now that we have this colorful butterfly shape, I then merged all these shapes together to make them one layer. You do this first, by selecting each colored shape from the layer panel. If you click on the first shape layer at the bottom (right above the butterfly), click shift and then click the very top layer, it should select them all. (If you look to the right, all my colored shape layers are highlighted blue).

17. With all the color shaped layers selected, the next step is to merge them into one. Right click and select merge shapes or use the control +E or Command +E function on windows/mac. (look to the far right in the layer panel, I now only have 2 layers, my original butterfly and the custom shape that we just created)

18. The next step is to add text to that butterfly shape we just created. First click on the butterfly shape, (you will see the lines from all the shapes when you do this, it's ok) then click on the “text” box option from the left. That will then allow more options at the bottom, I selected the horizontal text direction, chose my font, font size, color and how I wanted my text aligned (for this tutorial, I chose centered text align as I felt it looked the best).

19. I then copied the text I wanted to use and took my cursor and hovered over the butterfly shape that I created. The cursor should turn to a circle shape when hovering over the inside of the shape. (It’s a rectangle when outside of the shape). With the cursor as a circle, I clicked inside the shape box and pasted my text.

20. Now that I have the text pasted in, I hid the custom butterfly shape so it isn’t visible (click on the eye on the layer to hide it). AND now we have text that wraps inside the butterfly shape.

Hope you enjoyed this tutorial and can’t wait to see what you do with it.
If you have any questions, feel free to drop them below!.
xxxxx,
Esther
No comments:
Post a Comment
Note: only a member of this blog may post a comment.