Tuesday, 26 July 2016

PRETTY PAGES FROM THE PINK REPTILE GALLERY | by GAËLLE

Hello, Gaëlle here to share my selections for this month's Pretty Pages. This was not easy work ... as there are so many gorgeous pages in the gallery, but here is my selection :


My first pick is by jesskab. I love the white space and the paint / brush work. The little word strips finish the page and go so well with the cute picture.

I Love You | jesskab
http://the-lilypad.com/forum/galleries/i-love-you-prd-june-challenge.259456/

My second pick is a page from silent ranks. I love the monochromatic design and the picture blended with the mask. The frame with the clusters around the photo is really amazing.

Blessed | silent ranks
http://the-lilypad.com/forum/galleries/blessed.259279/

My last pick for this month is by sandsock. I love the horizontal design and the series of pictures. Fantastic work with the brushes and paints, which really draw the focus to the pictures.

Focus | sandsock
http://the-lilypad.com/forum/galleries/focus.259002/

Thank you to these talented ladies for sharing their pages with us in the PRD gallery. I hoped you enjoyed my picks!

Just click on the layouts to go to the Pink Reptile gallery at The Lilypad so you can leave some love.

An keep posting your pages there so we can be inspired by you too and maybe your layout will be featured here next month!!!!!

Tuesday, 19 July 2016

HYBRID | ALBUM IN A BOX


Hello scrapbooking fans! In today's post I want to show you how you can easily make a cute little mini album in any box you have lying around. All you need to do is adjust the sizes of your papers to the size of the box you are using. For my project I picked a transparent plastic box that used to hold business cards.


To create my album I cut 4 pieces in a kraft paper 9.5 x 11 cm.


 Each paper is folded in half.


Then I glued one photo on every page. As you can see the size of my photos is just a little smaller than the size of the paper.


Once the pictures were in place I started decorating all of them. For my husband's page I used a label from Limitless | Elements. I cut leaves pattern with my cuttlebug and stapled it to the page with 2 staples
The strip of paper was cut in a yellow paper from Forget Me Not | Papers.


For my daughter's page I also used a label and a brad from the Limitless | Elements and I cut out a camera leaves with my cuttlebug. The papers are from Dreams | Papers.


 I attached the brad with staples.


Another cuttlebug cut out leaf on my son's page aswell as a label and patch from Limitless | Elements. The cute flower that I added as a finishing touch comes from the Lucky in Love | Elements.


And for my own page I followed the same recipe with the cutout leaf and label. The flower is from Counting The Days | Elements.


The next step was to gather the 4 pages and stick them together to create an album
I used double sided tape for this.


 To finish I added the cover with a beautiful paper from Sea Of Love.


 I closed my album with a yellow wire with a bow.


Then I put the album in my box and I decorated the lid.


 And voilá a perfect memento and/or gift!


As always I hope you enjoyed my post and if I inspired you in any way, shape or form then by all means make a photo of your project and upload it to your gallery so you can leave a link in the comment section below! I'd love to see what you made!

Friday, 15 July 2016

JULY BLOG CHALLENGE

Hi everyone! Welcome to the July Blog Challenge! We are super excited to share another wonderful freebie for you this month, but before we share the details of our new challenge, let's see who the winner for the June Challenge is!!! You can take a peek at all the awesome entries HERE.


And.....drumroll.....Sandy is our winner this month!!!

Congratulations Sandy aka wvsandy!!! You have a notification on your TLP account.
All other participants also received their 25% discount coupons via their Lilypad gallery accounts. Please make sure you check your messages everyone and if your coupon didn't come through send an e-mail to pinkreptiledesigns at gmail dot com!

Here's Sandy's super cute page:


For this month's challenge, we are thrilled to share another template in our series of Template Freebies "Inspired by the Pink Ladies" where we take a page created by one of our talented Pink Ladies and turn it into a freebie template for you! This month's "Inspired by Freebie Template" is inspired by a page designed by Barbara aka Sokee!!! Thanks so much for letting us use your page Barbara!

Your job is to use this template for this month's challenge! Of course you can twist it, shake it and/or turn it around! Use it as it or make it your own!
Just click on the image to grab it, it's FREE!

- LINK EXPIRED -

Pink Reptile Designs Challenge Template

I absolutely can not wait to see your pages!


Check out these inspiring pages by the Pink Ladies:
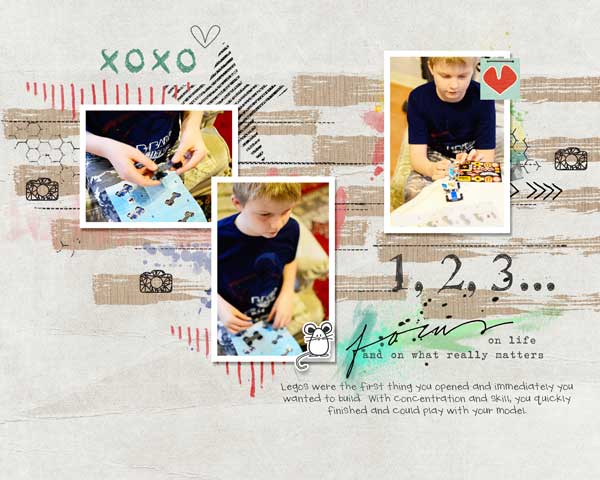
by Diane [dvhoward]

by Erin [chickypow]

by Guest KarenW

by Gaëlle [Ga_L]
by Jenn McCabe


Make sure you use at least 75% of Pink Reptile Design products on your page. Once completed, just upload your page to one or all of your galleries and post a link to your layout in the comments section of this post before the next challenge goes live on August 15th.

ONE winner will receive a 10 dollar coupon to the PRD store, but really everyone is a winner, as all other participants receive a 25% discount coupon to the Pink Reptile Designs TLP store. So all the more reason to join in on the fun, right?!

Wishing you tons of fun and Happy Scrappin'!

Tuesday, 12 July 2016

THREE WAY | DESIGNING WITH DOODLES


Hi Scrapping Friends! It's been awhile, but I am back with a brand new edition of my Three Way Series, where we show you creative ways to use and stretch your stash. Today we are going to be looking at fun ways to use doodles on our pages.

There are so many fun doodle packs in the Pink Reptile Designs store at The Lilypad. Emphasizers, ScribbleDeeDo and almost every element pack Mirjam makes has some kind of cute little doodle within. I thought it might be fun to try to play with these doodles in new ways. Are you ready to play with me? Let's go ...

First up ... is the idea to really make a statement with a doodle by taking one doodled bit and repeating it neatly on your page. I took this cute doodled triangle from the ScribbleDeeDo | Brushes & Stamps pack and made several rows and used it as a border on the bottom edge of my page. It also makes a nice landing for my photo. (I also merged all the triangle layers together and clipped a paper to it to change the color ... but more on that in a minute!)

Here's my page with this simple trick to use one doodle repeatedly :


The next idea to incorporate a doodle on your page in a different way is to make it over-sized. It's such a simple idea but one I think many of us do not do often enough. Try it ... it will change up the look of your usual pages and it just so easy! On this page I took a word art doodle "Hello", from the Emphasizers Vol. 2 pack . again this gave my photo a place to sit and added some oomph to my page. I also used the tip above, and repeated the word on 3 different lines, this time making it a border on the top edge of my page.

Here's my page with this easy tip to use one over-sized doodle :


The third and last idea I want to share is using a doodle with papers so that it no longer appears to be a doodle. This gives the doodle a completely different look and feel. If you use a shadow on the doodle after you clip some pretty patterned paper to it, it will look like a little scrap of paper taking on the shape of the original doodle. If you leave it shadowless, like I did on my page below, it makes it feel more painterly and soft. I took a border doodle from the Emphasizers Vol. 2 pack and repeated it a few times on my page. I clipped multiple papers to each row and it became the foundation for my photo area.

Here's my page using this technique :


That's all for this edition of the Three Way Series. I hope you are inspired to try to play with your doodles in creative and new ways.

 Watch this video to see how I made my pages in a more step by step way:


Pink Reptile Designs : Three Way Series | Designing with Doodles on Vimeo.

Happy Scrapping!