
We all love to place flowers and other items into our clusters of
elements to accent a favorite photo. Sometimes the flower/element may be
too large and by transforming the size, really doesn’t quite work for
the affect you are going for on your layout. Here is a fun little tip to
help with that, and almost give the flower/element a 3D look that will
appear as if it is jumping off the page and you can physically touch it!
**Note: For this tutorial, I am using Adobe Photoshop CC, but this should work pretty similar in all graphic software.
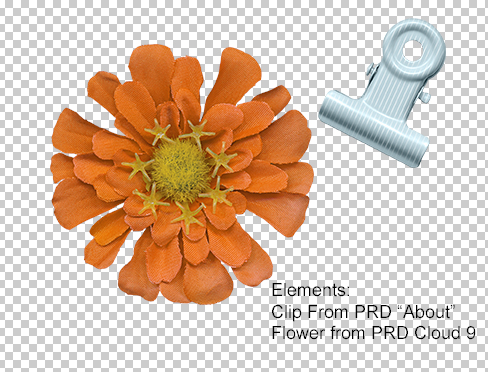
Let’s start with choosing 2 basic items. I have chosen 2 Pink Reptile Design elements: A clip from PRD’s “http://the-lilypad.com/store/About-Elements.html” elements, and the flower from PRD’s “http://the-lilypad.com/store/On-Cloud-9-Collab-with-Alisson-Pennington.html“ Collab kit with Allison Pennington.
Open up your workspace and place both of these elements on your “canvas” (or whatever clip or flower of another PRD design).
Using
the Rectangle Marquee and the flower layer selected in your layer
pallet, cut the flower directly down the center, as shown in example
below.

With
“marching ants” still active, (still on the flower layer), go to your
toolbar and select Edit > Cut from the drop down. Then select Edit
> Paste and you should now have this:

When
you paste, it automatically places the pasted portion on a separate
layer. Locate & select the top layer of the flower that you just
pasted. Now go to your toolbar and select Edit > Transform >
Vertical to flip.

(should be Transform not Transfer)
Once
it is flipped, using the mover tool, move the newly flipped portion of
the flower above/overlapping the lower portion on the flower.

In
your layer pallet, select both portions of your flower. (Click on the
lower layer and with your left mouse button still held, using the shift
button, click on the top half of the flower to highlight both the flower
layers at the same time. If the are not one above the other in the
pallet, instead of shift, use Ctrl on a PC or Command on a Mac and click
the other half of the flower in the layer pallet.)
Once both
parts of the flower are selected, from the toolbar go to Edit >
Transform > Rotate, and rotate them to the angle of the clip or the
direction you want the flower and clip to be. (- If you want it to
remain as is (straight across) this step could be eliminated, or rotate
the clip so it will work for your layout.)
If your clip is below the
flowers in your layer pallet, just move the clip up by selecting the
layer of the clip and drag it above the flowers as shown in my layer
pallet in the screenshot below. (You can also arrange the clip to the
top of the layer pallet by going to your toolbar, choose Layer >
Arrange > Bring to front)

Now
we are going to add shadows. (If you wish you can also lightly burn the
edges or making them lighter in areas by using the burn & dodge
tools.) Select the layer and add your favorite shadow style by selecting
the fx at the bottom of the layer pallet. It will bring up a dialog
box. Select Drop shadow. My style is set at Linear Burn 75%, 120 degree
angle, Distance = 4, Spread =0, Size=4 and Noise=0 (You can add noise if
you want for a fun kind of shadow!) Before selecting OK to apply,
select the New Style to add this style in your style pallet.

TIP ALERT
If this is not a “preset” style for you, or you forgot to save
as a new style, you can also use a copy & paste style. To do this,
you would select the layer style effects already applied to your current
layer. Right click with your Mouse and choose copy style. Then go to
the next layer in your layer pallet you want to apply the same layer
style to. Right click with your mouse and select paste style. This will
give each layer selected the same style so you don’t have to keep
redoing!
If you wish, you can also separate the shadow so you can
warp it or make it more lifelike. To separate the shadow from the
element, in the layer pallet right click with your mouse on the layer
style. From Dropdown list, select create layer and this will place the
shadow on a separate layer for warping. (I have created separate
layers for the shadows on the flowers. I also warped them and then used
the burn & dodge tools to give my flower some dimension.)

Now
all there is left to do is to complete the rest of your layout. You can
place things in between the layers, or under the flowers so it looks
like it is attached under the clip.

Voila! A simple layout to show how the folded flower may be used. (Journal card is from PRD’s “http://the-lilypad.com/store/About-Elements.html” elements and the background paper is from “http://the-lilypad.com/store/Forget-Me-Not-Papers.html”.)
I do hope you enjoyed this simple and easy tutorial and will give you some ideas for your own layouts!
Happy Scrapping!!
Christa
Love your tut Christa! I also love that you included how you shadow the folded flower, thanks for sharing!
ReplyDeleteWhat a great idea, thank you for sharing your tutorial! :)
ReplyDelete